HP ZBook Studio G4
Installation
EUFI setup
-
Boot into the UEFI:
Press: [F8] during boot (before posting!)
-
Enable booting from USB:
EUFI > Advanced > Secure Boot Configuration > Configure Legacy Support and Secure boot →Legacy Support Disable and Secure boot Disable
-
Enable Debian-compatible graphics (otherwize the installation wizard will hang after its first screen):
EUFI > Advanced > Build-in Device options > Graphics → Discrete
-
Exit & Save changes:
Press: [F10]
Bootable installation USB creation
-
Download the operating system:
-
Place image/iso on an USB stick and make it bootable:
Win32DiskImager (when using Windows)
Installation wizard execution
-
Boot from USB stick.
-
Follow the installation wizard.
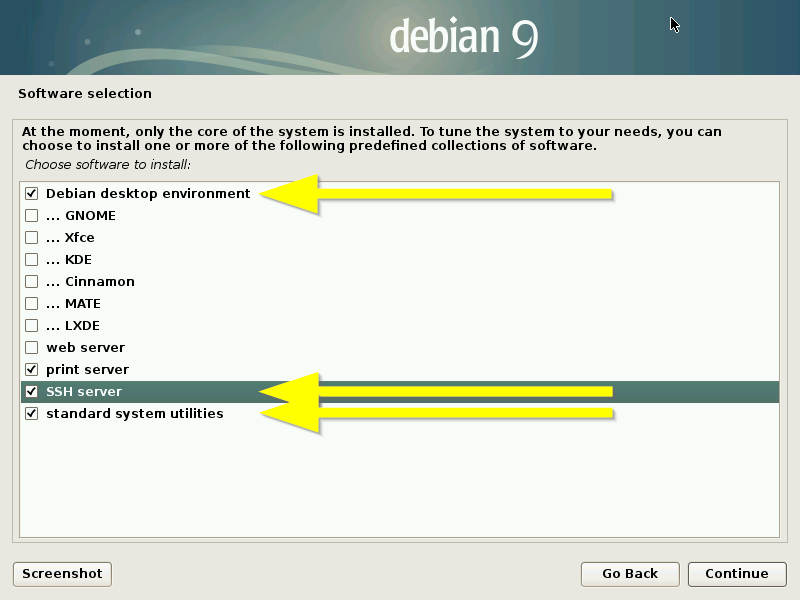
This Guide assumes you to install the Debian desktop environment, the SSH server and the standard system utilities at the Software selection dialog:
Utility tools installation
- Install your text editor of choice:
$ apt install vim
Proprietary driver installation 😡
iwlwifi driver installation 😡
- Edit the proprietery modules to apt and append
contrib non-freeto the regular Debian package row:$ vim /etc/apt/sourceslist - Update the apt repository cache and install the iwlwifi firmware package:
$ apt-get update && apt-get install firmware-iwlwifi - Reinsert this module to access installed firmware, as the iwlwifi module is automatically loaded for supported devices:
$ modprobe -r iwlwifi ; modprobe iwlwifi`
NVIDIA display driver installation 😡
-
Edit the proprietery modules to apt and append
contrib non-freeto the regular Debian package row:$ vim /etc/apt/sourceslist -
Update the apt repository cache and install the nvidia driver for the OS type at hand:
$ apt update && apt install linux-headers-$(uname -r|sed 's/[^-]*-[^-]*-//') nvidia-driver -
Restart your system to enable the nouveau blacklist.
-
Log-in.
-
Start the NVIDIA tool:
Search for
NVIDIA(press: [Windows] to open the search tool) -
Configure the NVIDIA X Server Settings as deemed fit:
EXAMPLE:
DP-3 - (LGD) > Color Correction > Brightness →
-0.50DP-3 - (LGD) > Color Correction > Contrast →
-0.50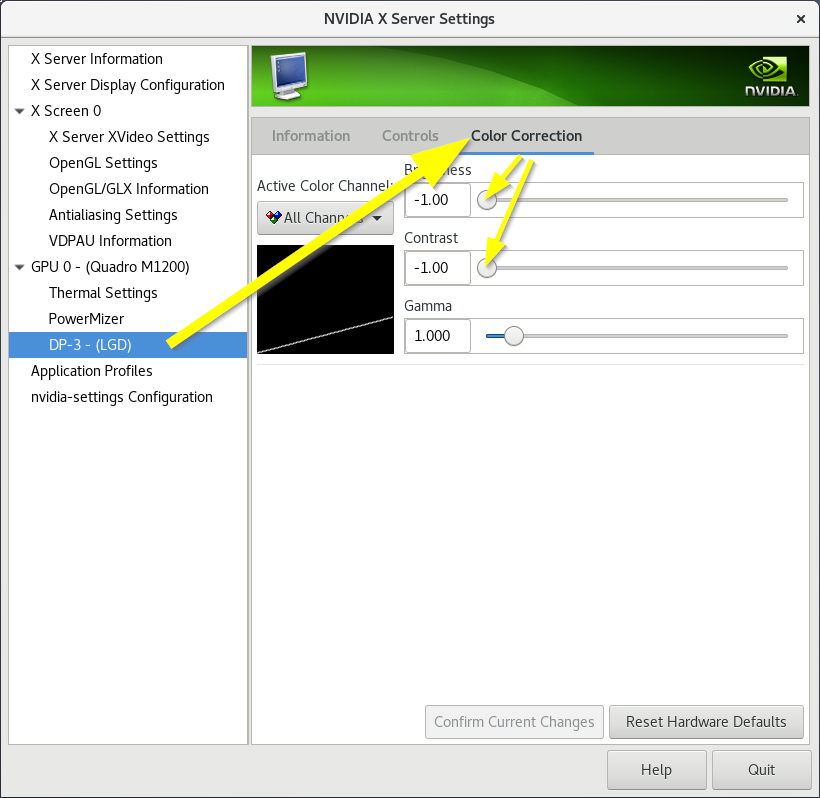 *
*
Configuration
Vino (Gnome desktop sharing)
- See: Vino section
SSH login hardening
- Install the open ssh server (if not installed already during the Debian installation wizard).:
apt install openssh-server - Edit the authorized_keys file and add your public RSA key:
vim ~/.ssh/authorized_keys - Edit the ssh daemon configuration file:
cp /etc/ssh/sshd_config /etc/ssh/sshd_config.bak && vim /etc/ssh/sshd_config- Turn on RSA key authentication:
- #PubkeyAuthentication yes + PubkeyAuthentication yes - Turn off text-password authentication:
- #PasswordAuthentication yes
+ PasswordAuthentication no
- Turn on RSA key authentication:
OPTIONALLY: In some cases the SSH daemon does not start automatically at boot:
systemctl enable ssh
Nextcloud
- Add repo:
add-apt-repository ppa:nextcloud-devs/client - Add key to your keyring:
apt-key adv --recv-key --keyserver keyserver.ubuntu.com AD3DD469 - Edit /etc/apt/sources.list.d/nextcloud-devs-ubuntu-client-disco.list and change the repo to
zesty:vim /etc/apt/sources.list.d/nextcloud-devs-ubuntu-client-disco.list - Update the apt repo cache:
apt update - Install the actual client:
apt install nextcloud-client
Also see: /Nextcloud/client-installation section of this site
OpenVPN
- Install the
openvpnpackage on both client and server.apt-get install openvpn - Install the additional package
network-manager-openvpn-gnometo enable OpenVPN in the Gnome NetworkManager:apt-get install network-manager-openvpn-gnome - Open the (Gnome) Network tool:
- Click the Activities button on the top-left side of the screen (or press [Windows] key) and Search for
Network).
- Click the Activities button on the top-left side of the screen (or press [Windows] key) and Search for
- Import the config file from the VPN:
- [+] > Import from file...
TEMPOARILY: Fix the 'Gnome network non connection issue' (browsers time out when browsing):
- Open the advanced VPN settings from the just imported VPN connection:
- VPN title > [cogwheel] > Identity > [Advanced...].
- Check: ☑ Use LZO data compression
- Open the advanced VPN settings from the just imported VPN connection:
- [+] > Import from file...
Displaylink
As discussed on the Displaylink forum:
- Install the git tooling (if not installed already):
apt install git - Clone (copy/download) the git displaylink-debian repository:
git clone https://github.com/AdnanHodzic/displaylink-debian.git - Start the cloned shell script:
./displaylink-debian/displaylink-debian.shALTERNATIVELY: Download and run script without Git:
wget https://raw.githubusercontent.com/AdnanHodzic/displaylink-debian/master/displaylink-debian.sh chmod +x displaylink-debian.sh && ./displaylink-debian.sh - Open the Gnome Displays options (e.g. click the Activities button on the top-left side of the screen (or press [Windows] key) and Search for
Displays), to configure the display settings as deemed fit!ALTERNATIVELY: Start it from CLI
Issue `gnome-control-center display` - Consult Post Install Guide!
REFERENCES:
- Debian on ZBook G3
NOTE: Not a ZBook G4, but it is the best match I can find at the time of writing.